
Hey Learners! Welcome back to my blog. In this blog, we will learn about the basic need of Git and GitHub for DevOps engineers.
As DevOps engineers, we need to play the bridging gap between the Operations and Development teams. We need to ensure an efficient development workflow with sturdy infrastructure management. let's explore!
What is Git?

Git is a version control system that allows us to track changes to files and coordinate work on those files among multiple people. With Git, you can keep a record of who made changes to what part of the file, and you can revert to earlier versions of the file if needed. It also makes it easy to collaborate with others, as you can share changes and merge the changes made by different people into a single version of the file.
What is GitHub:-
GitHub is a web-based platform that provides hosting for version control using Git, where developers can store and manage their code effortlessly. GitHub is widely used for open-source projects, but it also supports private repositories for commercial and private software development.
What is Version Control?
Version control is a system that tracks changes made to files and directories over time, allowing developers to manage and collaborate on software development projects efficiently. It keeps a history of changes made, compares different versions, and reverts to previous states if needed.
Types:-
There are two types
Centralised Version Control System (CVCS):- A centralized version control system (CVCS) uses a central server to store all the versions of a project's files. Developers "check out" files from the central server, make changes, and then "check-in" the updated files. Examples of CVCS include Subversion and Perforce.
Distributed Version Control System(DVCS):- A distributed version control system (DVCS) allows developers to "clone" an entire repository, including the entire version history of the project. This means that they have a complete local copy of the repository, including all branches and past versions. Developers can work independently and then later merge their changes back into the main repository. Examples of DVCS include Git, Mercurial, and Darcs.
Why we use DVCS:-
Better collaboration: In a DVCS, every developer has a full copy of the repository, including the entire history of all changes. This makes it easier for developers to work together, as they don't have to constantly communicate with a central server to commit their changes or to see the changes made by others.
Improved speed: Because developers have a local copy of the repository, they can commit their changes and perform other version control actions faster, as they don't have to communicate with a central server.
Greater flexibility: With a DVCS, developers can work offline and commit their changes later when they do have an internet connection. They can also choose to share their changes with only a subset of the team, rather than pushing all of their changes to a central server.
Enhanced security: In a DVCS, the repository history is stored on multiple servers and computers, which makes it more resistant to data loss. If the central server in a CVCS goes down or the repository becomes corrupted, it can be difficult to recover the lost data.
Overall, the decentralized nature of a DVCS allows for greater collaboration, flexibility, and security, making it a popular choice for many teams.
Exercise:-
Task 1- Create a new repository on GitHub and clone it to your local machine
To create a repository on GitHub, sign in to your GitHub account using
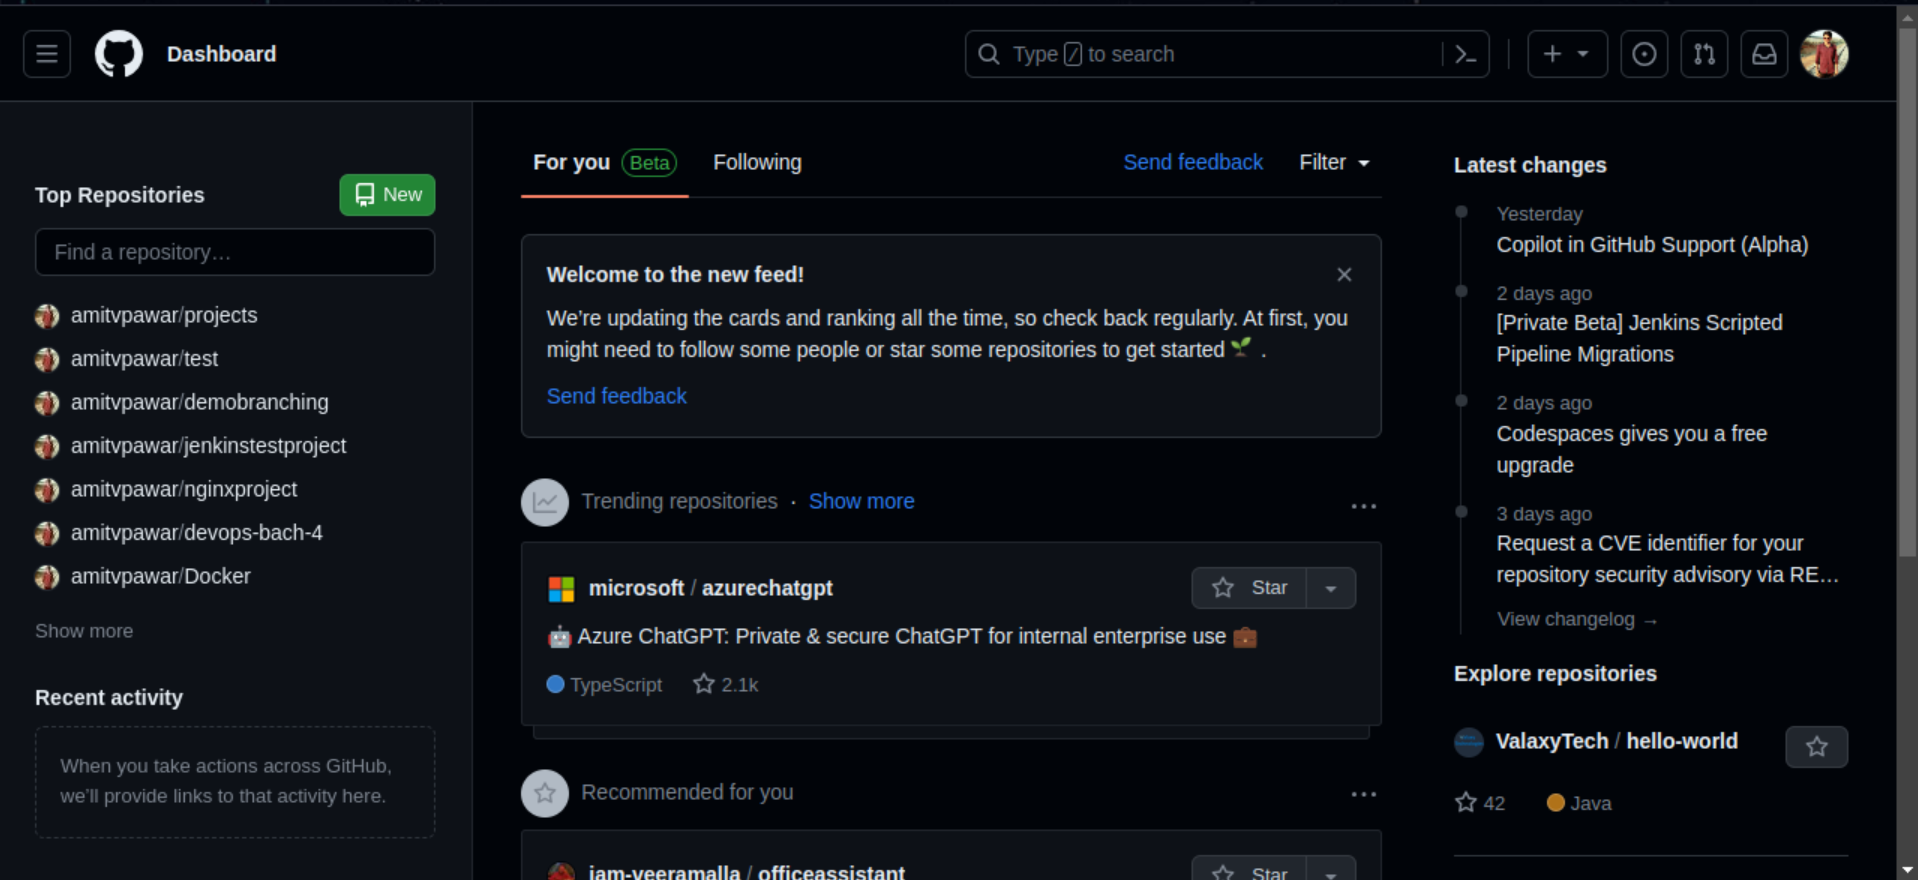
https://github.com/(If you don't have GitHub account then instead of "sign in" use the "sign up" option and go through the procedure to make an account).Click on New (green button as shown in the screenshot below) to create a new repository.
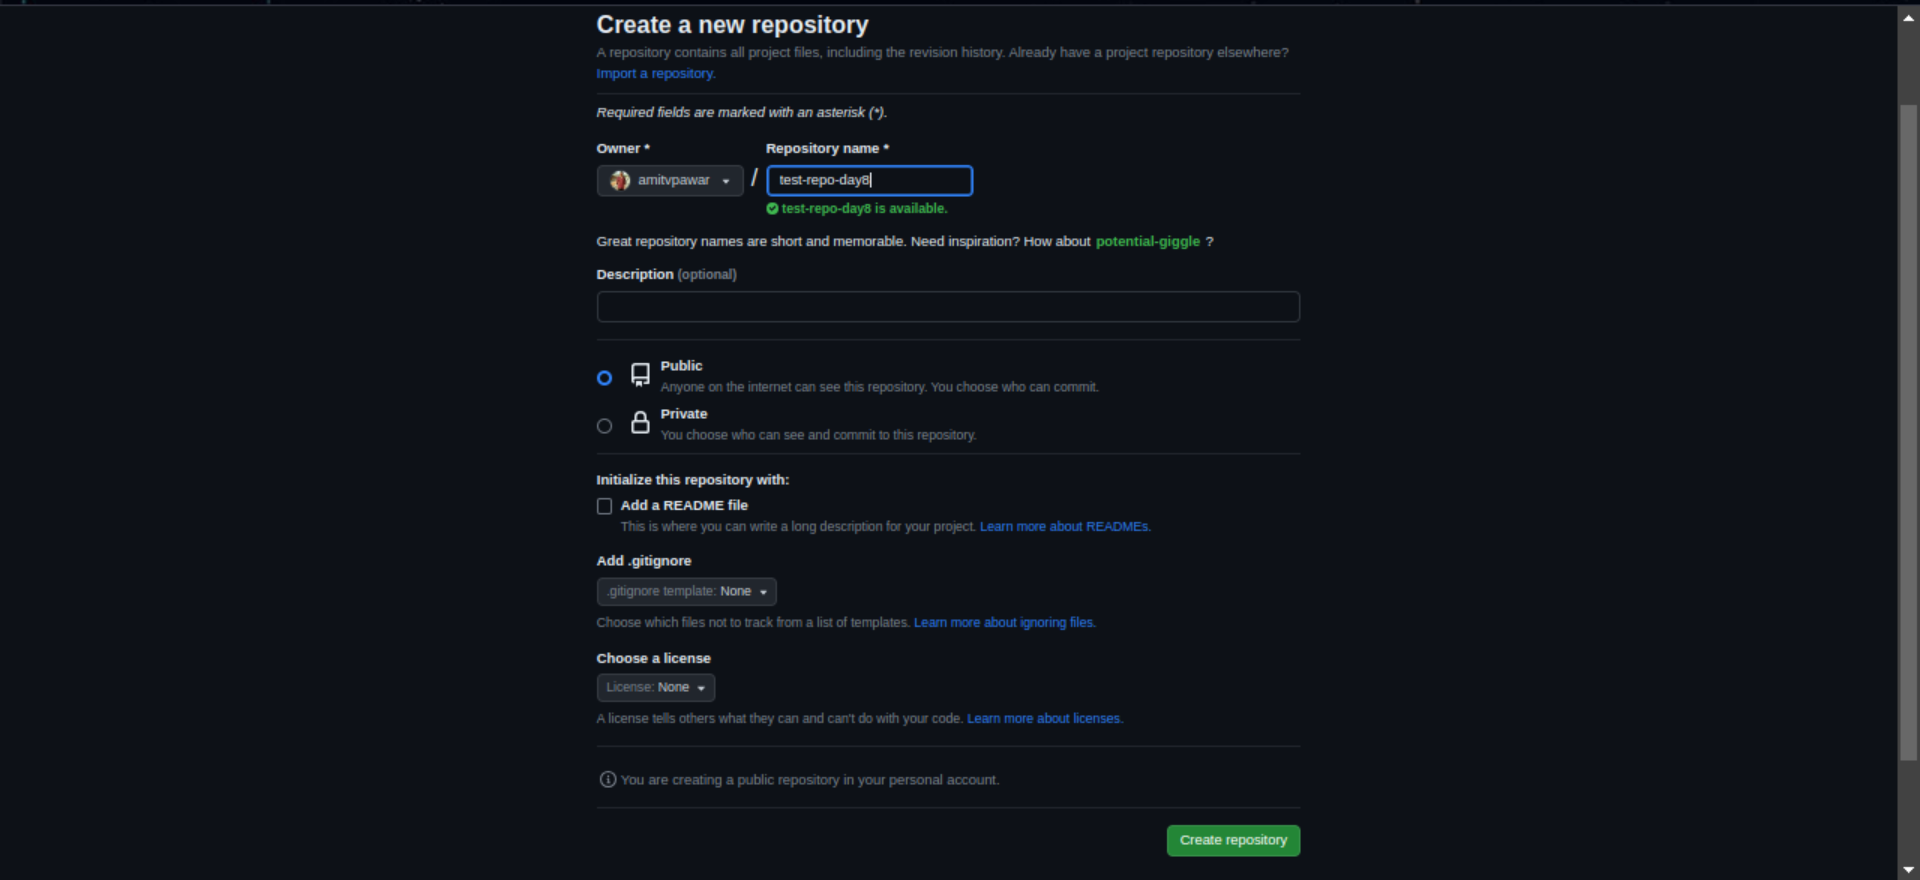
Enter your repository details and then Create Repository button
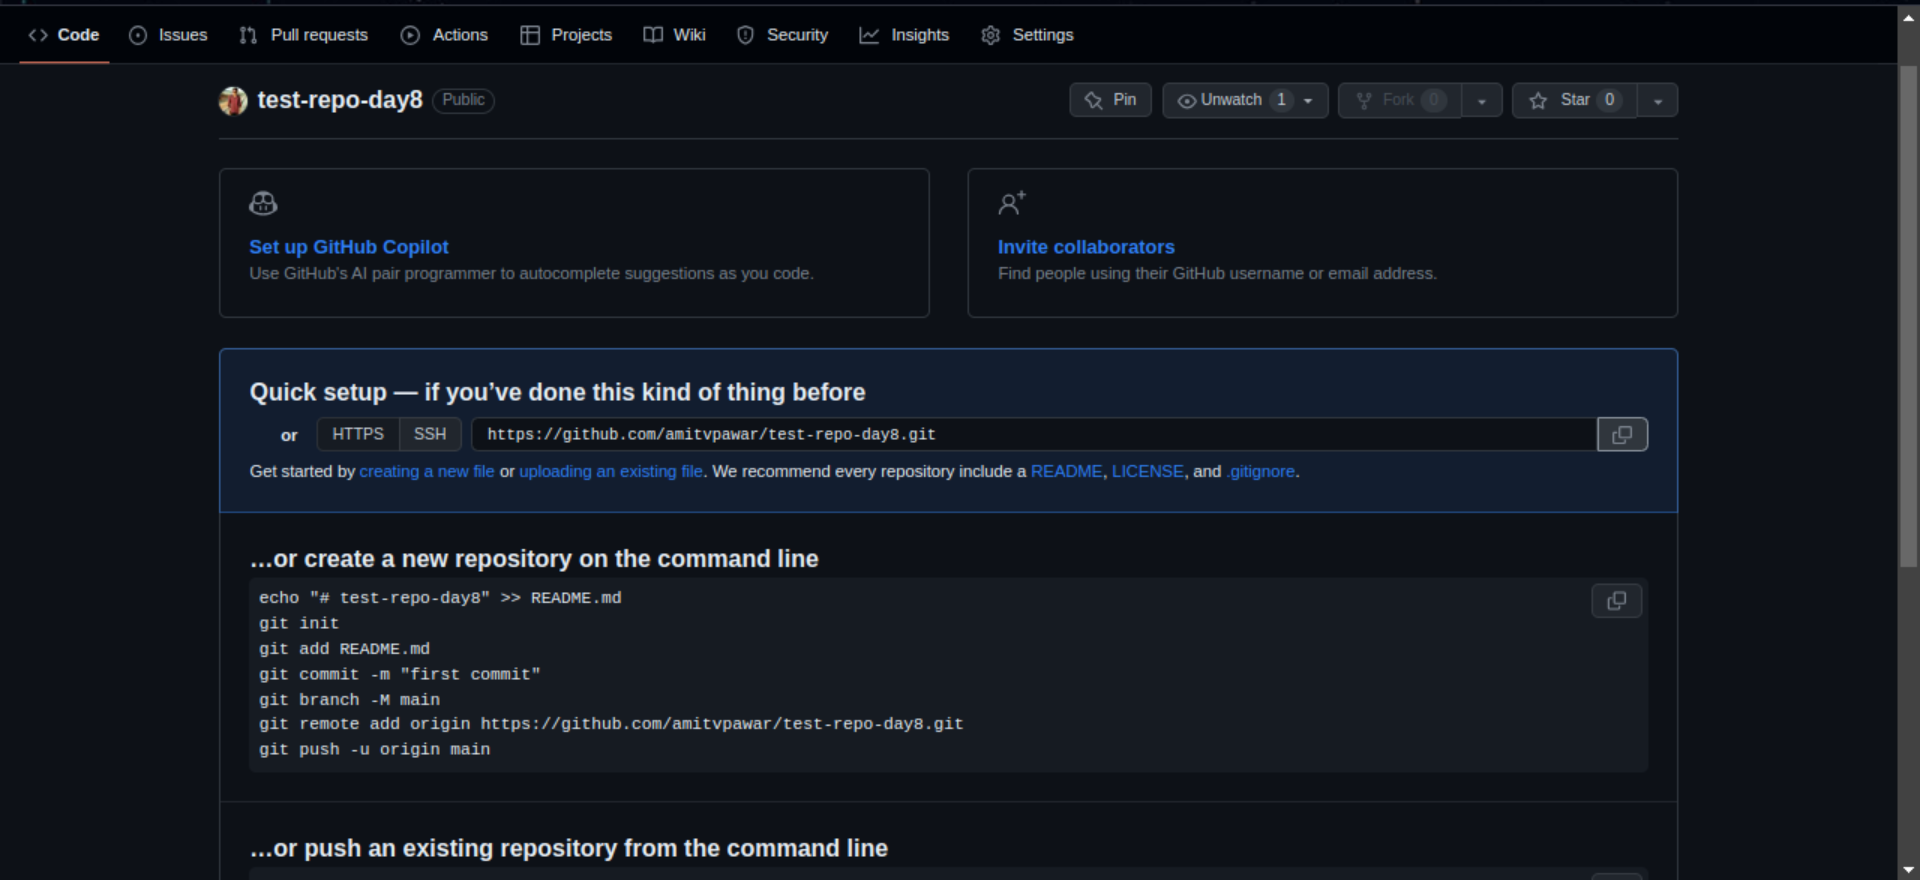
Your new repository is ready.
Task 2- Make some changes to a file in the repository and commit them to the repository using Git
To make any changes in the created repository using git we have to clone our repo in the local system and then make changes.
Go to the GitHub account and sect the repo you need to clone. Copy the git repository URL. (in this case https://github.com/amitvpawar/test-repo-day8.git)
Use
git clone <git-repo-url>command to clone the repo as shown below.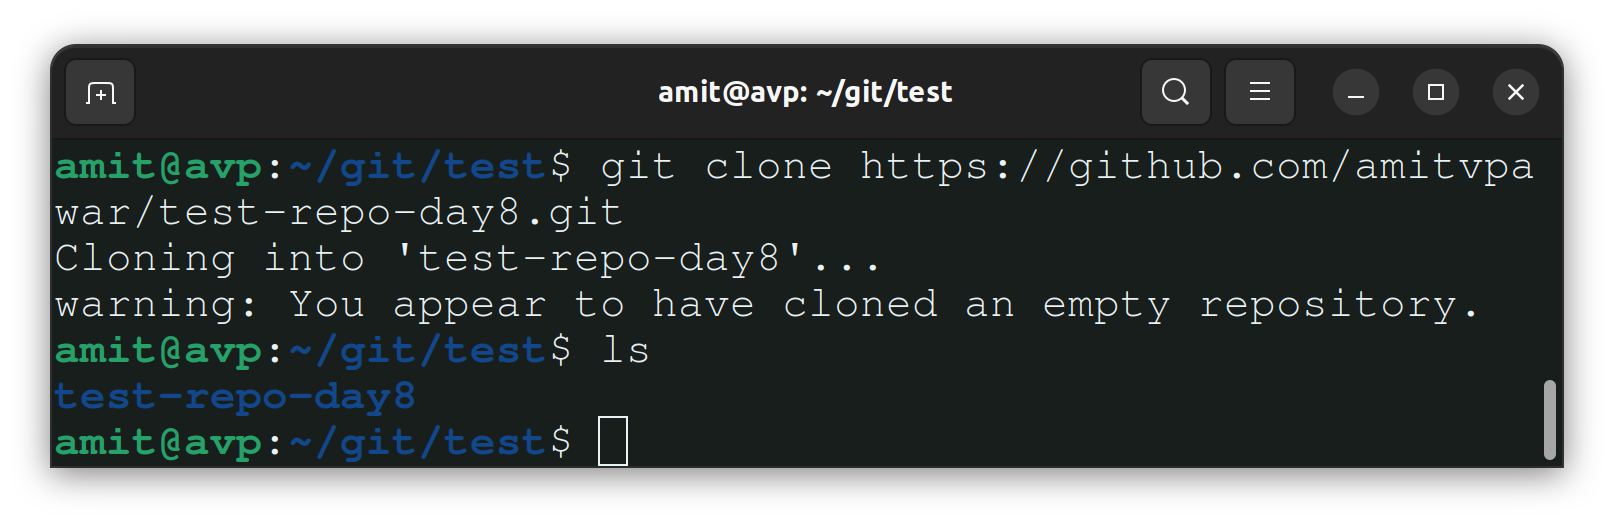
As we have an empty repository we'll add some files as shown below and committed using the following commands.
Stage the changes:- use
git add <./anyspecificfile>to stage the changes.Track the changes:- use
git commit -m "Any comment"to track the changes.
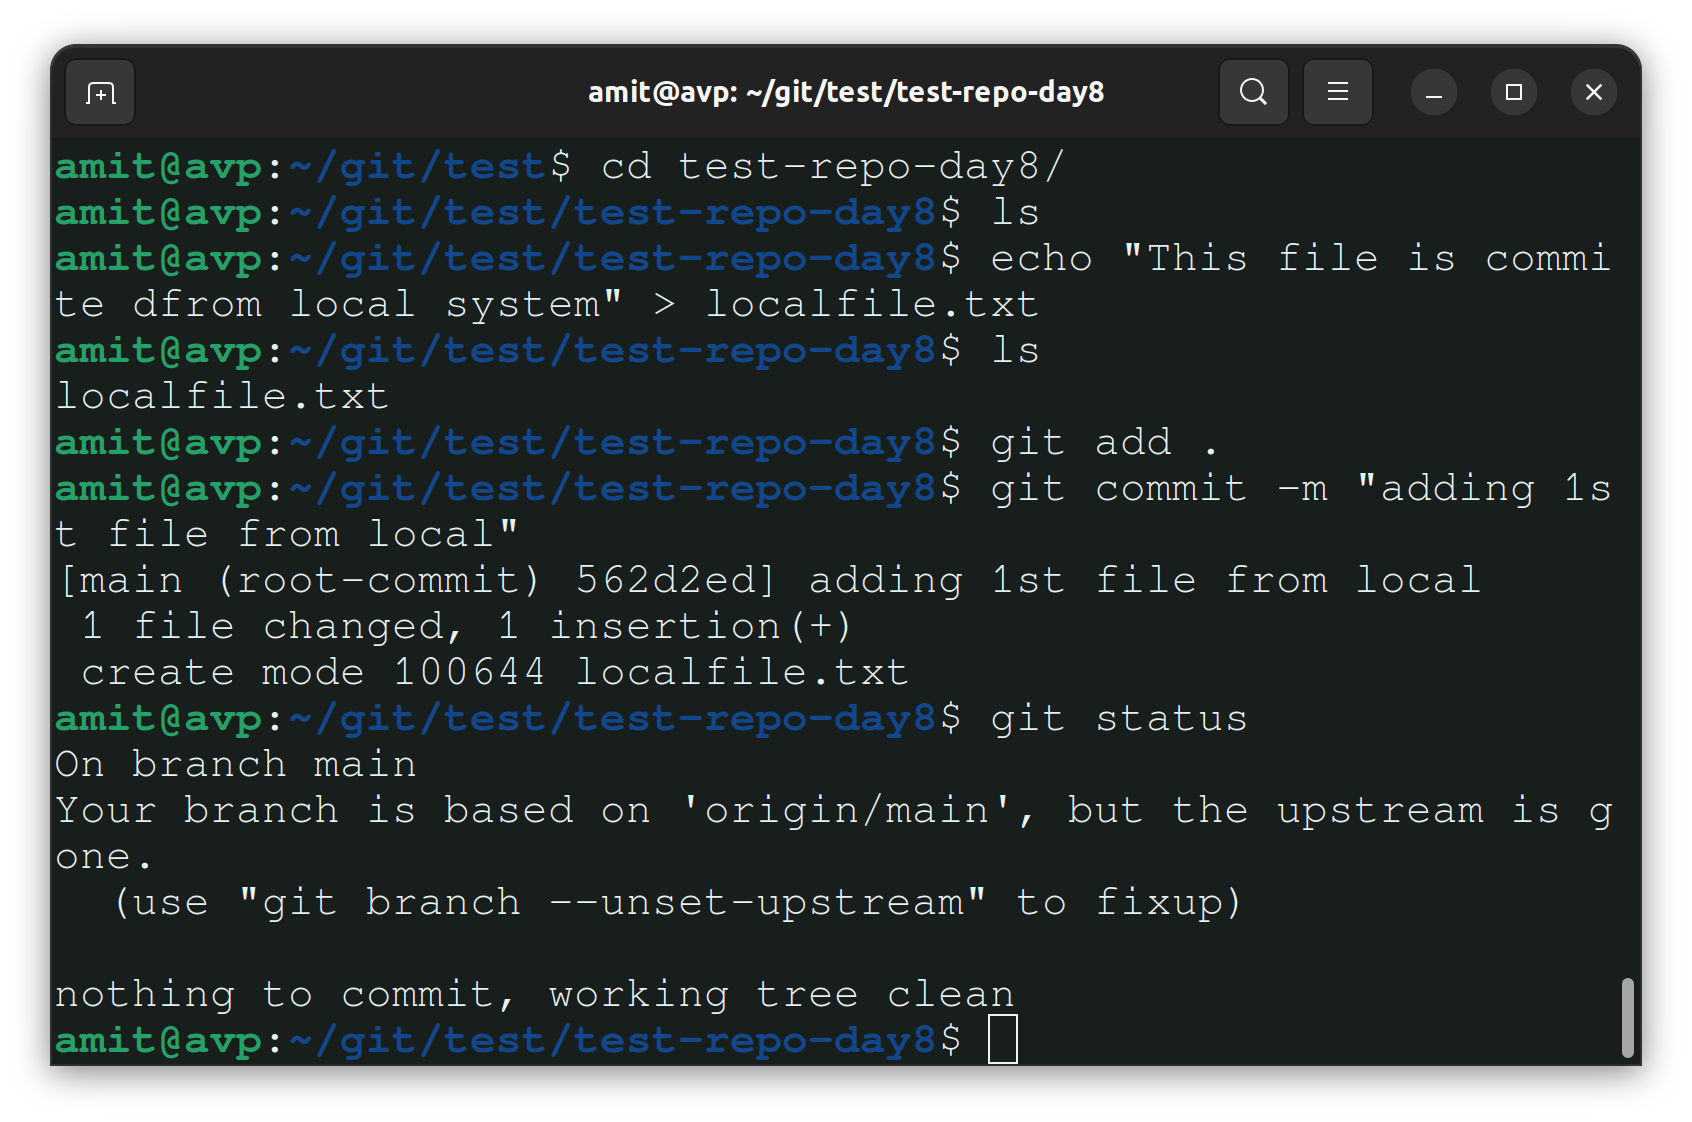
- Now we are successfully making changes in the local repository. We'll push the changes made in the next Task 3.
Task 3- Push the changes back to the repository on GitHub
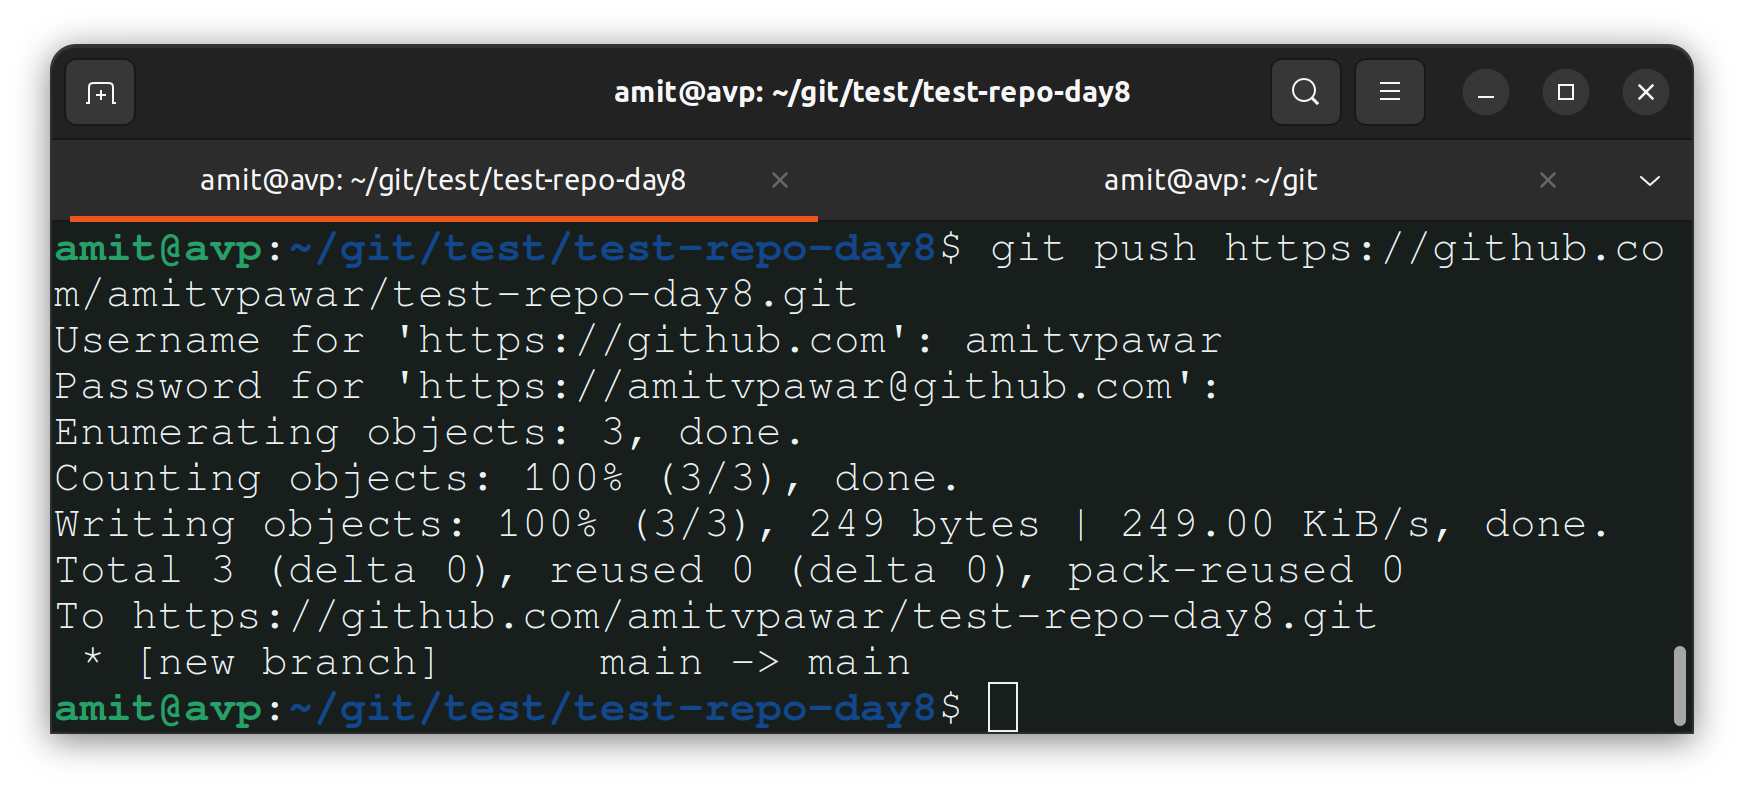
To push the changes we made in Task 2 use
git push <git-repo-url>. It will ask for Username and Password.Username:- You can easily find it in your copied URL. In this case, the username is "amitvpawar".
Password:- If you enter your GitHub password it will give an error as "support for password authentication was removed on August 13, 2021". To overcome this create a "token-key".
Go to GitHub Profile>>Settings>>Developer Settings(Right-hand side)>>Personal access keys>Tokens(classic)>> Generate new token(classic) > Give permissions for repo(for now)> Generate token. Copy generated token and use this token as a password.
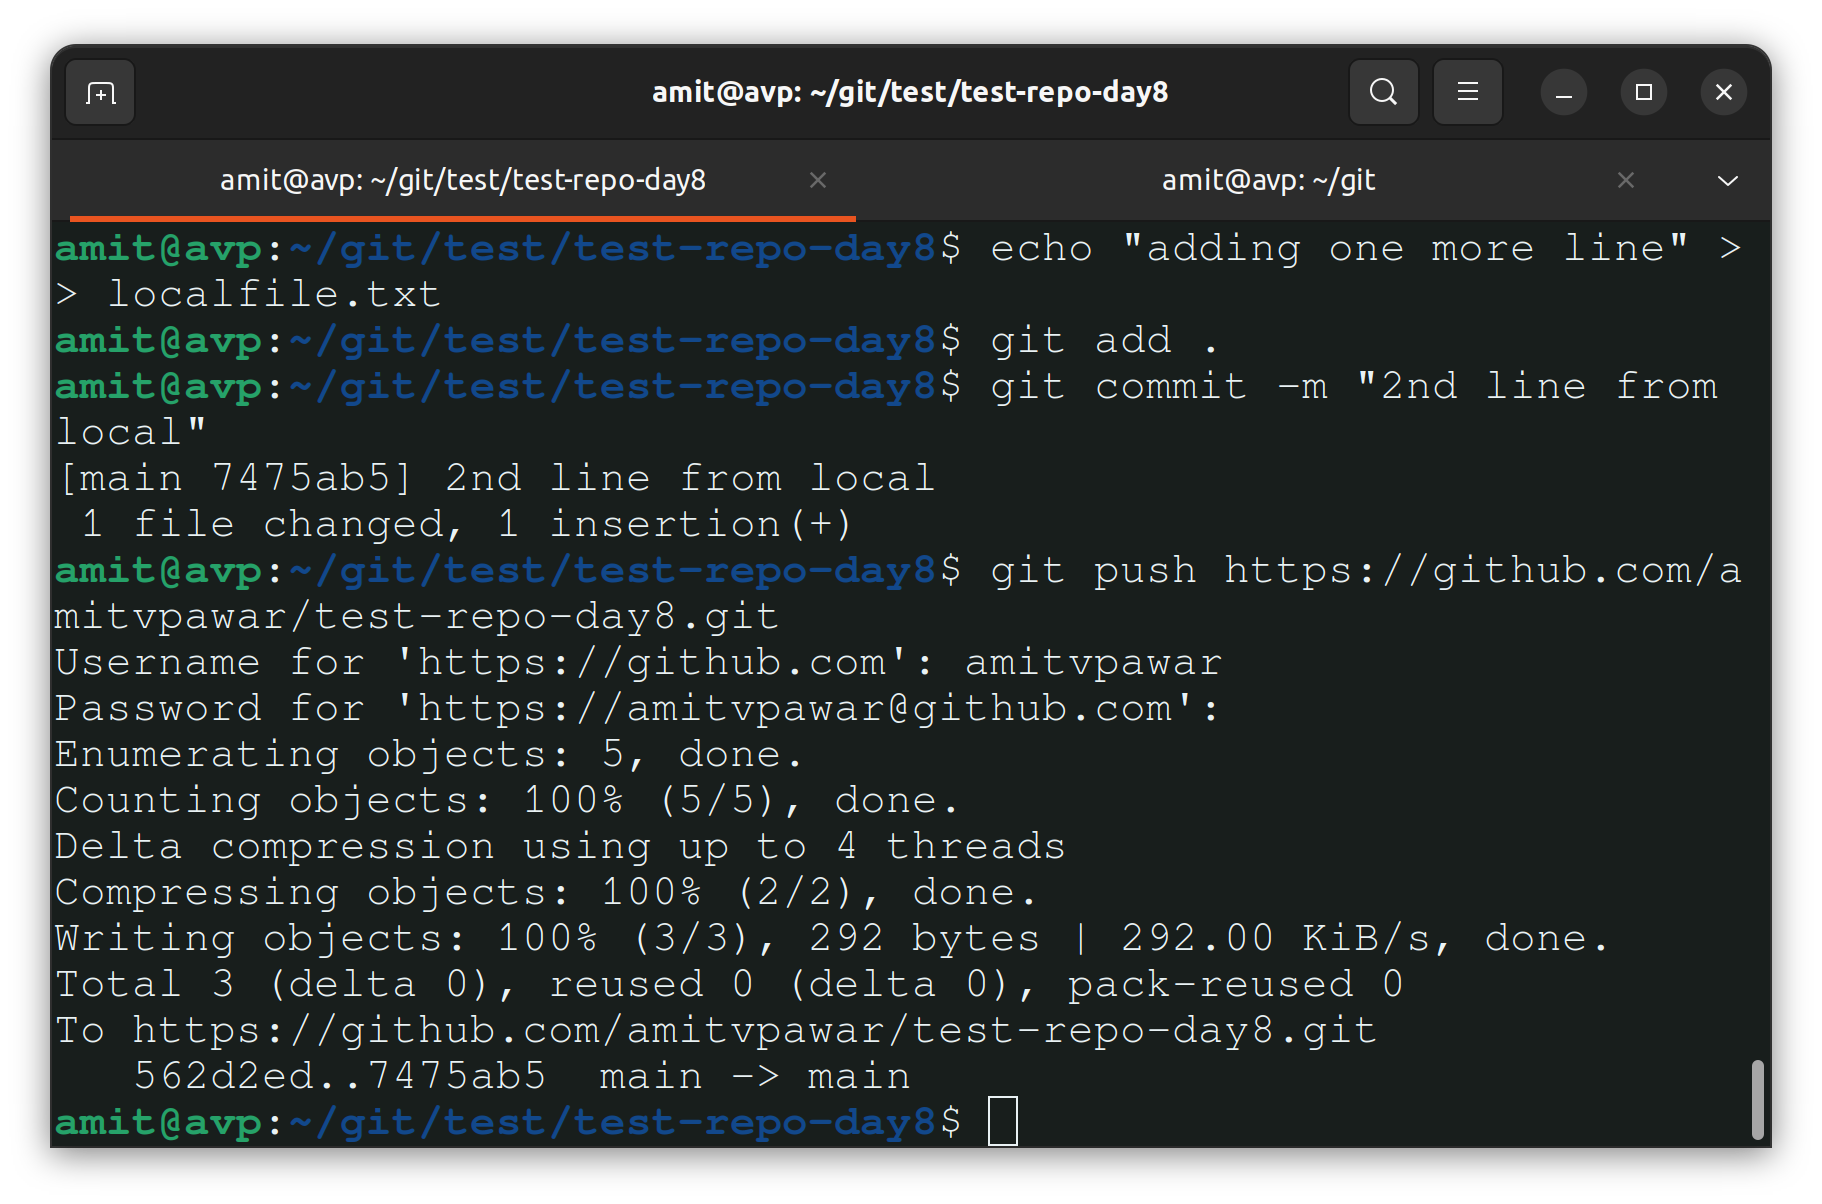
Adding one more commit for the demo.
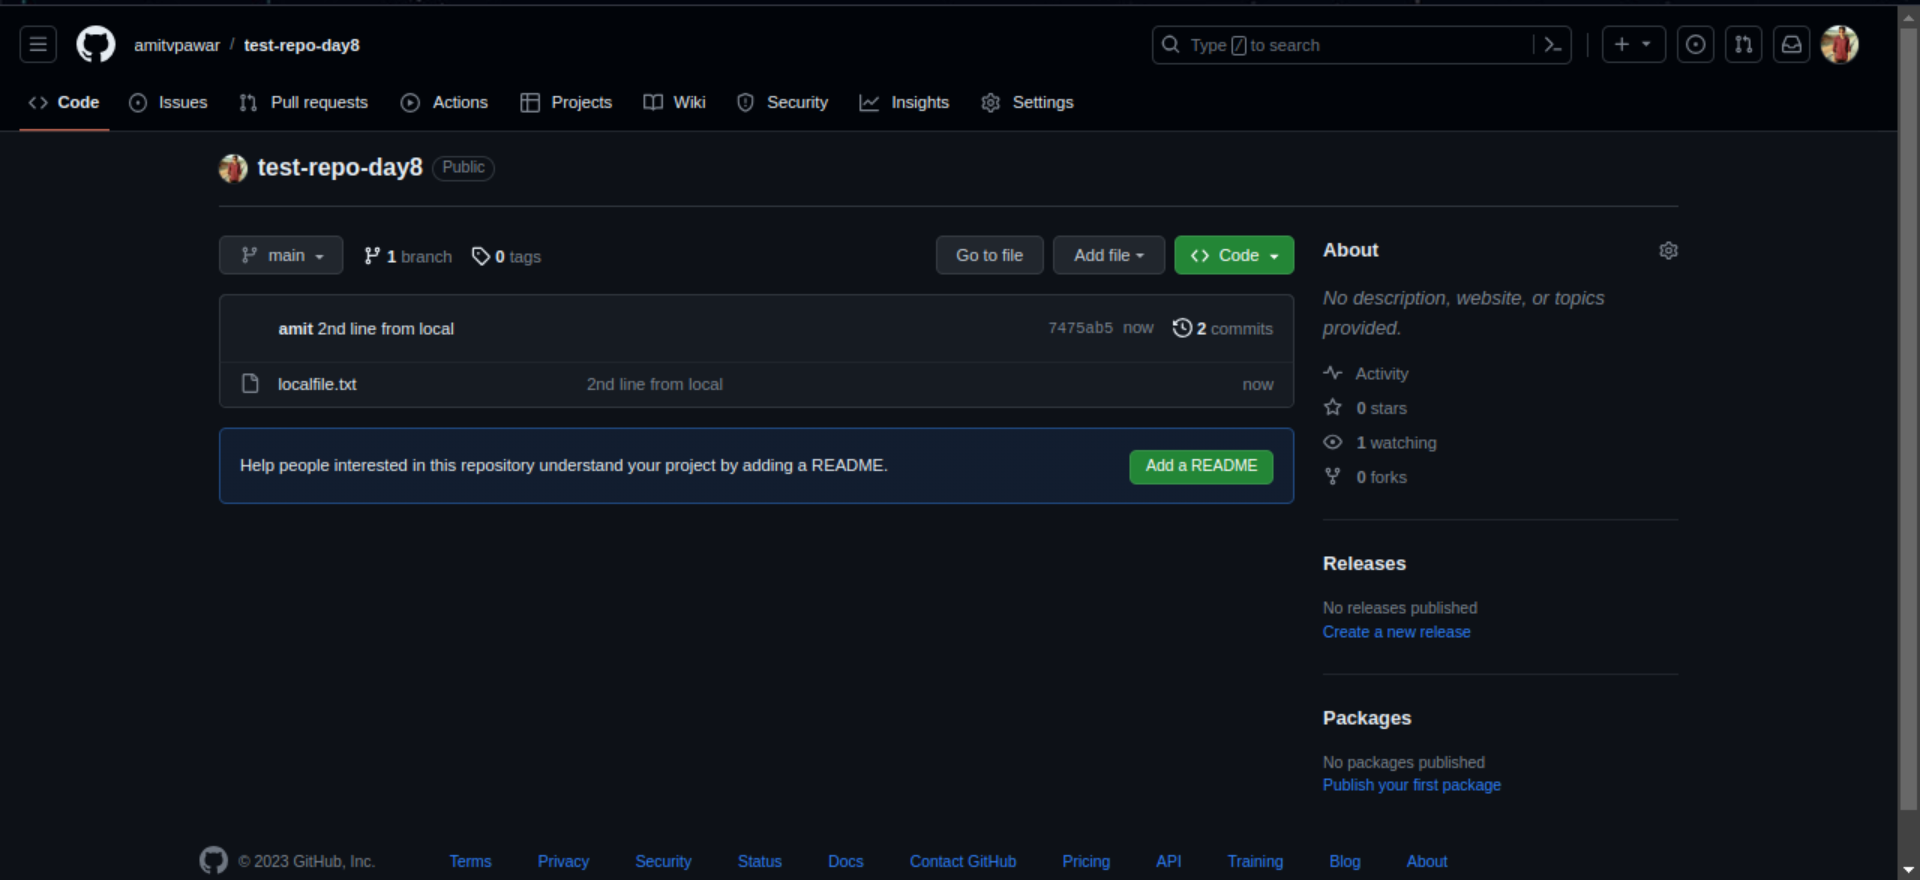
We can cross-verify our push from GitHub. Go to the repository to check changes pushed from local.
Thank you so much for taking the time to read till the end! Hope you found this blog informative and helpful in understanding Basic Git And GitHub.
Feel free to explore more of my content, and don't hesitate to reach out if need any assistance from me or in case of you have any questions.
Find me on:- Hashnode LinkedIn Github
Happy Learning!


